In this blog, I will show you how you can transfer usdt from a Binance account to another Binance account 100% free and you have to pay zero fee.
What is Binance?
Binance is a cryptocurrency exchange that was founded in 2017 by Changpeng Zhao. It is one of the largest cryptocurrency exchanges in the world, with a daily trading volume of over $10 billion. Binance offers a variety of features, including spot trading, margin trading, futures trading, and staking. It also has a native token, BNB, which can be used to pay for fees and to participate in Binance Launchpad, a platform for launching new cryptocurrencies.
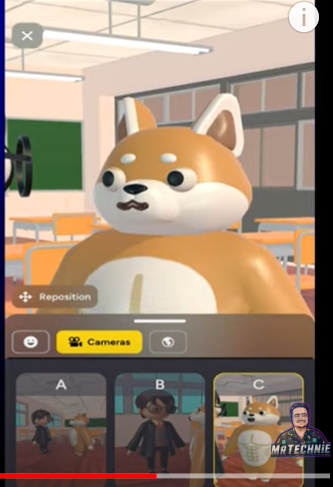
In this blog, I will show you how you can create cartoon short reels and videos from an Android application in a few steps.
It is free of cost and very easy.
First of all download application on your Android phone.
MovieBot AI is an app that allows you to create animated videos with the help of artificial intelligence. It is available on both iOS and Android devices.
To use MovieBot AI, you first need to create a story prompt. This can be anything from a simple sentence to a more detailed description. MovieBot AI will then use its AI to generate an animated video based on your prompt.
You can customize your video in a number of ways. You can change the characters, the environment, and the dialogue. You can also add your own voice and face performance to the characters.
MovieBot AI is a great way to create animated videos quickly and easily. It is perfect for anyone who wants to make their own cartoons, memes, or educational videos.
Here are some of the features of MovieBot AI:
Create animated videos instantly from text prompts
Fully customizable 3D worlds
Record your own animation, voice, and face performance for your characters
In this blog, I will show you how you can easily view and cancel pending orders and cancel them on one click If you want to buy or sell coin at the same time select Market.
What is Binance?
Binance is a cryptocurrency exchange that was founded in 2017 by Changpeng Zhao. It is one of the largest cryptocurrency exchanges in the world, with a daily trading volume of over $10 billion. Binance offers a variety of features, including spot trading, margin trading, futures trading, and staking. It also has a native token, BNB, which can be used to pay for fees and to participate in Binance Launchpad, a platform for launching new cryptocurrencies.
You have to fill out the form and then you will get an invitation after a few days.
What is Adobe Firefly?
Adobe Firefly is a family of generative AI models designed to jump-start creativity and accelerate workflows in Adobe products. It is currently available in beta in Adobe Photoshop and is expected to be rolled out to other Adobe products in the future.
Firefly can be used to create a variety of media, from still images to video to 3D. It can also be used to edit and generate text, as well as to create brushes, vectors, and textures.
To use Firefly, you can either type in a description of what you want to create, or you can upload an image or piece of text that you want to use as a starting point. Firefly will then generate a new piece of media based on your input.
Firefly is still under development, but it has the potential to revolutionize the way that creatives work. It can help them to come up with new ideas, to speed up their workflows, and to create more realistic and engaging content.
Here are some of the potential benefits of using Adobe Firefly:
Increased creativity: Firefly can help you to come up with new ideas that you might not have thought of on your own.
Faster workflows: Firefly can automate some of the tasks that are typically time-consuming, such as creating textures or brushes.
More realistic content: Firefly can generate content that is more realistic and engaging than what you could create on your own.
If you are a creative professional, then you should definitely keep an eye on Adobe Firefly. It has the potential to be a powerful tool that can help you to take your work to the next level.
Here are some of the limitations of Adobe Firefly:
It is still under development, so it is not always perfect.
It can be expensive to use, as you need to have a subscription to Adobe Creative Cloud.
It is not as versatile as some other generative AI tools, such as DALL-E 2.
Overall, Adobe Firefly is a promising new tool that has the potential to revolutionize the way that creatives work. However, it is still under development, so it is important to be aware of its limitations.
Write anything and click the button "Generate".
The speed of this tool is very fast.
Here the Aspect ratio, content type, styles, and many more filter options are also available on the right sidebar.
In this blog, I will show you how you can remove blur from any image without downloading any software or installing any application. You just have to open the website upload image and get a clear image. Even you don't need to create an account.
I am going to show you two amazing free websites to convert your blurry images into clear images without downloading any software or application.
If you want to clear your old blurry images with just a single click, this blog is for you.
You can also remove your background in Unblur image and there are also many tools available if you want to clear your images you have to click on Unblur and here you have to upload the image you don't have to create an account just, you have to upload an image.
PicWish is an AI-powered online photo editor that offers a variety of features to help you enhance, edit, and transform your photos.
Some of the features include:
Background removal: This is one of the most popular features of PicWish, and it allows you to remove the background from your photos in just a few clicks. This is great for e-commerce, social media, and other applications where you need to have a transparent background.
Photo enhancement: PicWish can also enhance your photos by improving the brightness, contrast, saturation, and other aspects of the image. This can help to make your photos look more professional and eye-catching.
Photo editing: PicWish also offers a variety of other photo editing features, such as cropping, resizing, rotating, and adding filters. This allows you to customize your photos to your liking.
PicWish is a free online tool, but there is also a premium subscription option that gives you access to additional features, such as batch editing and unlimited downloads.
Here are some of the pros and cons of PicWish:
Pros:
Easy to use
Powerful AI tools
Free to use
Wide range of features
Cons:
Some features are only available in the premium version
Uploading large files can be slow
Some users have reported that the results are not always consistent.
Overall, PicWish is a powerful and versatile online photo editor that offers a wide range of features. It is a great option for both beginners and experienced users who want to enhance, edit, and transform their photos.
Here you have to Click Tools --> Image Upscaler, you have to upload your image here.
AVAide is a website that offers a variety of multimedia software, including video converters, DVD rippers, image upscalers, and background removers. Their software is designed to be easy to use and powerful, and they offer a free trial so you can try it before you buy.
Some of the features of AVAide software include:
AI-powered technology: AVAide software uses AI technology to improve the quality of your videos and images. For example, their image upscaler can increase the resolution of your photos without losing quality.
Wide range of formats: AVAide software can convert videos and audio files to a wide range of formats, including MP4, MKV, MOV, and MP3.
Easy to use: AVAide software is designed to be easy to use, even for beginners. The interface is simple and straightforward, and the software comes with a step-by-step guide to help you get started.
Free trial: AVAide offers a free trial of their software so you can try before you buy. This is a great way to see if the software is right for you and to test out its features.
Here are some of the pros and cons of AVAide software:
Pros:
Easy to use
Powerful AI tools
Wide range of formats
Free trial
Cons:
Some features are only available in the premium version
The software can be slow on older computers
Some users have reported that the results are not always consistent.
Overall, AVAide is a powerful and versatile multimedia software suite that offers a wide range of features. It is a great option for both beginners and experienced users who want to edit their videos and images.
In this blog, I will show you how you can sell USDT on Binance in an easy and secure way. I will show you all the steps and I will also sell my USDT in this blog so you can learn this in an easy way.
What is Binance?
Binance is a cryptocurrency exchange that was founded in 2017 by Changpeng Zhao. It is one of the largest cryptocurrency exchanges in the world, with a daily trading volume of over $10 billion. Binance offers a variety of features, including spot trading, margin trading, futures trading, and staking. It also has a native token, BNB, which can be used to pay for fees and to participate in Binance Launchpad, a platform for launching new cryptocurrencies.
Go to the Binance website or app and log in to your account.
Click on the "Spot" tab, Where your USDT is kept.
Click on the "Transfer".
The next page will be shown sell from Spot Wallet.
Select your Wallet.
Select USDT, how many Usdt to transfer.
I transfer 40 usdt, It will go in Funding.
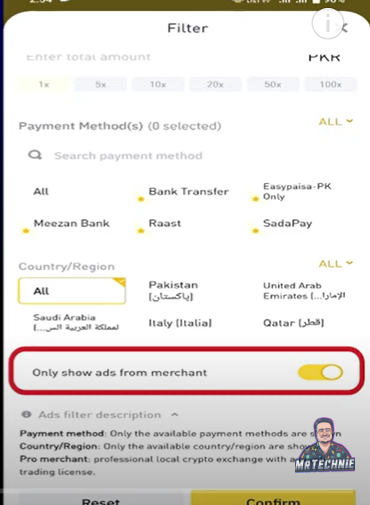
We will sell it through P2P, So Select "P2P".
In P2P, there are two options buy and sell.
There are many sellers available here.
Select "Payment Method".
Here is a Filter option also available, Click it.
You can purchase from merchants or local people.
You have to keep in mind a few important points.
Completion Ratio.
Trades.
Rs.
Limit.
You can trust that having a completion ratio is good.
Click the "Sell" Button.
Select "Payment Method".
Add Payment method, Your account name will be the same as your Binance account.
then Verification method.
Now sell with zero.
Check seller is online or not.
If the seller sends you payment so, Click payment received.
After, Confirm it and verify.
Here are some additional tips for live selling in Binance:
Use the "Market" order type if you want to sell your cryptocurrency immediately at the current market price.
Use the "Limit" order type if you want to sell your cryptocurrency at a specific price.
Use the "Stop-Loss" order type to sell your cryptocurrency if the price falls below a certain level.
Use the "Take Profit" order type to sell your cryptocurrency if the price rises above a certain level.
Once you have placed your sell order, it will be executed as soon as a buyer is willing to buy your cryptocurrency at the price you specified. You will then receive the fiat currency or cryptocurrency you selected as payment.
Here are some of the benefits of live selling in Binance:
You can sell your cryptocurrency immediately at the current market price.
You can set a specific price to sell your cryptocurrency at.
You can set stop-loss and take-profit orders to protect your profits or limit your losses.
Here are some of the risks of live selling in Binance:
The price of your cryptocurrency could fall before your order is executed.
You could sell your cryptocurrency at a lower price than you wanted.
You could miss out on a potential profit if the price of your cryptocurrency rises.
Overall, live selling in Binance is a convenient and flexible way to sell your cryptocurrency. However, it is important to be aware of the risks involved before you place a sell order.
In this blog I will you how you can earn money from Binance without investment, No skills are required to earn money from Binance.
What is Binance?
Binance is a cryptocurrency exchange that was founded in 2017 by Changpeng Zhao. It is one of the largest cryptocurrency exchanges in the world, with a daily trading volume of over $10 billion. Binance offers a variety of features, including spot trading, margin trading, futures trading, and staking. It also has a native token, BNB, which can be used to pay for fees and to participate in Binance Launchpad, a platform for launching new cryptocurrencies.
Binance has a referral program that allows you to earn commissions when you refer new users to the platform. The amount of commission you earn depends on the trading volume of your referrals.
There are two types of referral programs in Binance:
Standard Referral Program: The Standard Referral Program allows you to earn up to 20% commission on the trading fees of your referrals. The commission rate is calculated based on the daily average BNB balance of your account.
Friends Referral Program/ Lite Referral: The Friends Referral Program allows you to earn a trading fee rebate voucher for both you and your friend when your friend signs up and deposits more than $50 within 14 days of registration.
To participate in the referral program, you need to generate a referral link or code. You can then share your referral link or code with your friends and family. When they sign up for Binance using your link or code, you will start earning commissions.
The referral program is a great way to earn some extra money while helping your friends and family get started with cryptocurrency trading.
Here are some of the benefits of the Binance referral program:
You can earn commissions on the trading fees of your referrals.
The commission rate is up to 40%.
You can earn a trading fee rebate voucher for both you and your friend.
The referral program is easy to participate in.
If you are interested in participating in the Binance referral program, you can learn more about it on the Binance website.
For example, you refer anybody from your refer, so you will get a 20% commission on his all tradings.
How to use it:
Open Binance Application.
Click Referral.
If this Referral option is not available so click ... More, Or Search it.
You can read the rules of it.
When your friend is at the time of registration so you can provide a referral code or link.
In this blog, I will show how you can combine multiple images into One very easy, no more annoying process to add multiple URLs. You can all do this by just uploading images.
What is Midjourney:
Midjourney is a text-to-image AI that allows users to generate realistic and creative images from text descriptions. It is still in beta, but it has already been used to create a wide variety of images, including landscapes, portraits, and abstract art.
In 2023, Midjourney is expected to continue to grow in popularity. The team is working on improving the quality of the images and adding new features. They are also planning to make Midjourney more accessible to a wider range of users.
Here are some of the things that Midjourney is working on in 2023:
Improving the quality of the images: Midjourney is working on improving the realism and detail of the images it generates. They are also working on adding new styles and effects.
Adding new features: Midjourney is adding new features to make it easier for users to generate the images they want. These features include the ability to add text to images, edit images, and export images in different formats.
Making Midjourney more accessible: Midjourney is working on making Midjourney more accessible to a wider range of users. They are planning to add a free tier and to make the platform available in more languages.
If you are interested in using Midjourney, you can sign up for the waitlist on the website. Midjourney is currently only available to a limited number of users, but the team is working to expand access in 2023.
Here are some of the benefits of using Midjourney in 2023:
You can create realistic and creative images from text descriptions.
The quality of the images is constantly improving.
New features are being added all the time.
Midjourney is becoming more accessible to a wider range of users.
If you are looking for a powerful tool to create images, Midjourney is a great option. The platform is easy to use and the results are impressive.
Blend mode in Midjourney is a feature that allows you to upload two or more images and have Midjourney blend them together to create a new image. This can be a great way to combine different elements from different images to create something new and unique.
To use blend mode in Midjourney, you will need to first upload the images you want to blend. You can do this by dragging and dropping the images into the Midjourney chat window or by pasting the image URLs. Once you have uploaded the images, you will need to select the blend mode you want to use. Midjourney offers a variety of blend modes, including:
Normal: This is the default blend mode. It simply combines the two images without any special effects.
Add: This blend mode adds the brightness of the two images together. This can be a good way to create images with a brighter or more saturated look.
Multiply: This blend mode multiplies the brightness of the two images together. This can be a good way to create images with a darker or more dramatic look.
Screen: This blend mode subtracts the brightness of the two images together. This can be a good way to create images with a lighter or more airy look.
Overlay: This blend mode combines the brightness of the two images together, but it also adds some of the color information from the bottom image. This can be a good way to create images with a more vibrant or colorful look.
Once you have selected the blend mode, you will need to hit enter to generate the new image. Midjourney will then blend the two images together and create a new image. You can then preview the new image and decide if you want to keep it or try again with different settings.
Blend mode is a powerful tool that can be used to create a variety of different effects. It is a great way to combine different elements from different images to create something new and unique. If you are looking for a way to create more creative and interesting images, I recommend trying out blend mode in Midjourney.
Here are some tips for using blend mode in Midjourney:
Experiment with different blend modes: There are a variety of different blend modes available in Midjourney, so experiment with different ones to see what effects you can create.
Use high-quality images: The quality of the images you use will affect the quality of the results. Use high-quality images with a lot of detail to get the best results.
Be creative: Blend mode is a great way to be creative and experiment with different ideas. Don't be afraid to try new things and see what you can create.
Using Blend Mode:
If you are really looking to combine multiple images immediately and you always use multiple URLs to combine these images really suck, so don't worry we can combine multiple images with Midjourney without pasting the URLs, here we have a blend mode, we don't need to paste any URL we just have to upload images and Midjourney will combine all the images.
We can upload up to 5 images here so, let's use blend mode on a laptop. I have opened Discord and let me show you the setting, write /setting, in which we will use for this blog here you can see that I am using the mid-Journey version 5 high-quality style medium fast mode
If you don't have a premium version, you can also use this using the new version 4. So let's use the blend mode now type slash blend now here you have to upload the images which you want to combine (/Blend).
I have two images here one dog image this one and I will paste another cat image the simple cat without any style and let's see how much Midjourney combines these images so here you can upload more images also image 3 image 4 image 5 I am uploading two images here.
Here you can see that mid-Journey has combined both images, it contains both characters you can see a little bit of a dog and a little bit of a cat and also you can see the styles are also added in this image so it means that blend mode is working perfectly.
In this blog, I will show you how you can convert your text into video and AI Video with just your text. This website has integrated ChatGPT so you just have to give the topic name and this website will create all slides with text, you can add many backgrounds update text add animations, and much more.
Transforming text into videos with many avatars can be achieved using various techniques and tools. One popular method is using animation software or platforms that allow you to create animated videos with customizable avatars.
Generating AI videos instantly typically involves utilizing pre-trained AI models that can generate or manipulate video content. While I can provide you with an overview of the process, please note that the specific implementation and availability of such services may vary over time.
Elai.io is a software-as-a-service platform that allows users to create videos using just text. The platform uses artificial intelligence to generate human avatars that speak the text that is entered. Elai.io can be used to create a variety of videos, including presentations, explainer videos, and marketing videos. The platform is easy to use and does not require any special skills or knowledge.
Here are some of the features of Elai.io:
Text-to-speech: Elai.io uses artificial intelligence to generate human voices that speak the text that is entered. The voices are realistic and can be used to create engaging and informative videos.
AI avatars: Elai.io uses artificial intelligence to generate human avatars that appear in the videos. The avatars can be customized to look like different people.
Video templates: Elai.io provides a variety of video templates that can be used to create videos. The templates include different styles and layouts.
Translation: Elai.io can translate videos into 75+ languages.
Customization: Elai.io can be customized to meet the specific needs of users. For example, users can upload their own images and videos.
Elai.io is a powerful tool that can be used to create high-quality videos quickly and easily. The platform is ideal for businesses, educators, and anyone who wants to create engaging and informative videos.
Adobe Express is a free online design and video editing tool that allows users to create graphics, videos, and social media posts. The tool offers a variety of features, including:
Templates: Users can choose from a variety of templates to get started, or they can create their own designs from scratch.
Assets: Adobe Express includes a library of assets, such as images, graphics, and fonts, that users can use in their designs.
Features: Adobe Express offers a variety of features, such as text editing, photo editing, and video editing.
Collaboration: Users can collaborate on projects with others, even if they don't have Adobe Express.
Adobe Express is a great tool for anyone who wants to create professional-looking graphics and videos without having to learn how to use complex design software. The tool is easy to use and offers a variety of features that can help users create stunning content.
Overall, Adobe Express is a great tool for anyone who wants to create professional-looking graphics and videos without having to learn how to use complex design software. The tool is easy to use and offers a variety of features that can help users create stunning content.
Click Make an animation for youtube.
There will be a page shown, where you can move, and arrange all images.
You can choose characters, backgrounds, and sizes(landscape for youtube video).
You can record or upload your voice.
You can signup from Google, or Facebook for downloading videos.
In this blog, I'll show you how to use images in reel video. This is a super easy and fastest way to create a 3d animation from your pictures. Just minutes from now, you'll be able to create amazing 3d animations with the help of AI.
What is AI?
AI stands for artificial intelligence. It is a branch of computer science that deals with the creation of intelligent agents, which are systems that can reason, learn, and act autonomously. AI research has been highly successful in developing effective techniques for solving a wide range of problems, from game playing to medical diagnosis.
Kaiber.ai is a website that uses artificial intelligence to generate videos. The website offers a variety of features, including:
Audioreactivity: Users can upload a song and have Kaiber generate a video that reacts to the music.
Animation: Users can start with a few words or upload their own image, and Kaiber will generate a video that brings their ideas to life.
Transform: Users can upload a video and have Kaiber transform it into an entirely new style or aesthetic.
Kaiber offers a free plan that allows users to generate videos up to 30 seconds long. Paid plans start at $120 per year and offer longer video lengths, more features, and access to the Kaiber gallery.
"Kaiber is an amazing tool for anyone who wants to create beautiful videos quickly and easily. The interface is easy to use, and the results are stunning. I highly recommend Kaiber to anyone who wants to level up their video content."
Here are some of the pros and cons of Kaiber:
Pros:
Easy to use
Variety of features
Affordable pricing
High-quality videos
Cons:
Limited video length on the free plan
Some features are only available on paid plans
Can be slow to generate videos
SignUp/ Login:
You can sign up with your Gmail account.
Login first.
Click Create a Video.
Upload image.
Click Next.
You can choose or write your opinion about what you want, I wrote: "Convert into the modern era".
In this blog, we will convert our text into animated videos like explanation videos, or fact videos, you can add voice many backgrounds, and much more.
What is AI?
Artificial intelligence (AI) is a branch of computer science that deals with the creation of intelligent agents, which are systems that can reason, learn, and act autonomously. AI research has been highly successful in developing effective techniques for solving a wide range of problems, from game playing to medical diagnosis.
There are many different types of AI, but some of the most common include:
Machine learning: This is a type of AI that allows computers to learn without being explicitly programmed. Machine learning algorithms are trained on large datasets of data, and they use this data to learn how to perform tasks.
Natural language processing: This is a type of AI that allows computers to understand and process human language. Natural language processing algorithms are used in a wide variety of applications, such as speech recognition, machine translation, and text analysis.
Computer vision: This is a type of AI that allows computers to see and understand the world around them. Computer vision algorithms are used in a wide variety of applications, such as self-driving cars, facial recognition, and medical imaging.
AI is a rapidly growing field, and it is having a major impact on many different industries. AI is being used to improve healthcare, transportation, manufacturing, and many other sectors. As AI continues to develop, it is likely to have an even greater impact on our lives.
Here are some of the benefits of AI:
Increased efficiency: AI can help to automate tasks that are currently performed by humans, which can lead to increased efficiency and productivity.
Improved decision-making: AI can help to make better decisions by analyzing large amounts of data and identifying patterns that humans might not be able to see.
Personalized experiences: AI can be used to personalize experiences for users, such as recommending products or services that they are likely to be interested in.